Equalization for Freediving

In the piece about Covid-19 and the freediving season so far I announced a post about equalization (or: equalisation) for freediving. Here it is! Maybe a little later than promised, but here nonetheless.

If you have visited this blog before, you’ll know I have written about my issues with equalization extensively. When I started out on this journey my main challenge was equalizing head down. If you want to read more about my personal experiences, you can read “The dawn of upside down equalization“, “Practice makes perfect” or “SSI level 2 freediving course” posts. They might contain tips that could help you as well.

This post will be a far more general introduction to equalization for freediving, totally made possible by my level 2 instructor Pavol Ivanov, who made good use of the Corona-measures imposed free time. Instructor Pavol is a protégé of Linda Paganelli, who was one of the original mouthfill guru’s.

We will focus on the techniques of Frenzel equalization, which is the best and most used technique for freediving. Frenzel is easiest for head down equalization, and definitely essential for transitioning from a beginner to an advanced freediver. Only after understanding the Frenzel technique well, you can start getting into mouthfill equalization for dives far below residual volume.

Okay, let’s get right into it with the first video:

How to learn the Frenzel equalization technique, by Pavol Ivanov.

In this video Pavol explains the difference between Valsalva and Frenzel equalization techniques and why the Frenzel method is preferred for freediving. He shows you how to check which technique you use naturally and what exercises you can do to get the right awareness for an effective Frenzel equalization. Be aware: even if you think you already have a steady Frenzel technique, this video is worth watching because it also contains some tips for finetuning it.

Pavol points it out several times, but it cannot be stressed enough: glottis control is very important. If you can’t keep it shut for the pressure manoeuvre, it greatly disadvantages your ability to equalize with the Frenzel technique. At the same time you need to be able to open it every now and then to recharge the air you need for the equalization. So practice glottis control often.

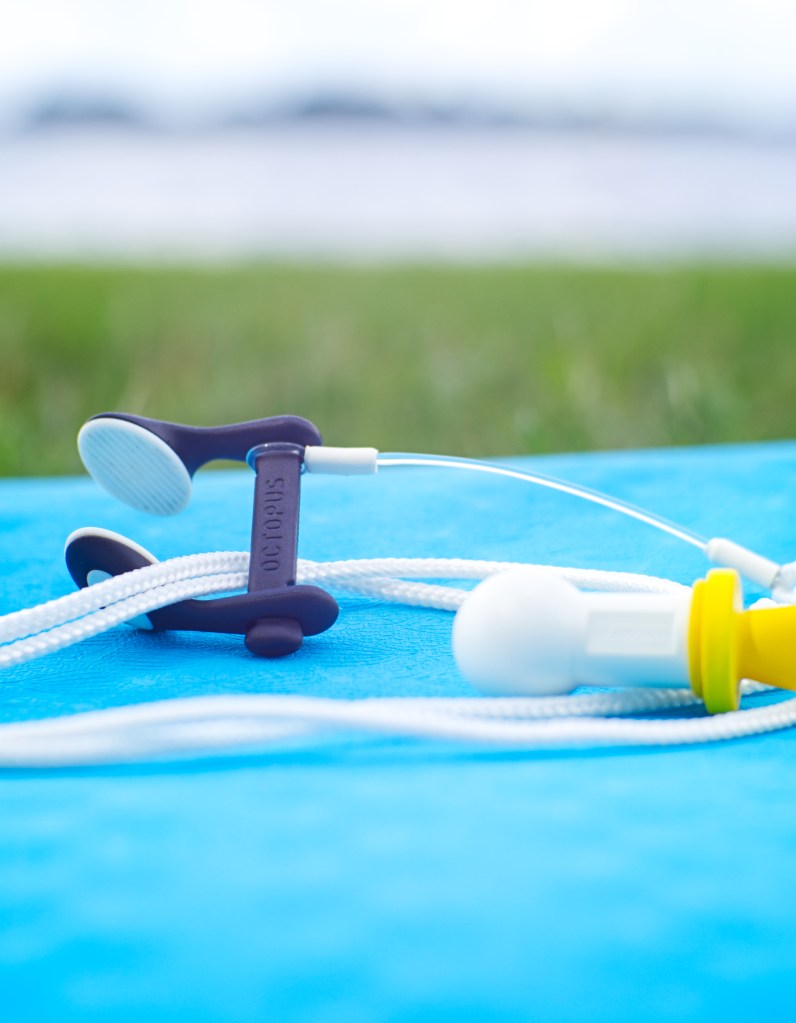
To finish the video Pavol introduces the Otovent tool as a way to check the status of your progress. Nowadays a lot of Freediving brands like Octopus and Molchanovs sell tools like this as well. It is a very valuable tool not only in the beginners phase of learning the Frenzel technique, but also when you are pushing your Frenzel to its depth limits and for the transition into the mouthfill technique.

Make sure your basics are perfect and then on to the next video:

How to take your Frenzel equalization as deep as possible, by Pavol Ivanov.

This video is about equalizing close to and beyond your residual lung volume. Pavol therefore introduces Boyle’s law as a factor in equalization. He also explains how learning the proper techniques from the beginning and getting the right awareness will help you in the long run. Such in comparison with the divers that start with no equalization problems at all and then reach the depths where they suddenly do encounter difficulties.

In the extensive introduction Pavol also discusses safety and potential dangers of progressing too quick and without caution, as well as the influence of flexibility and other physiological differences between divers.

After that Pavol goes into the motion of “recharging the Frenzel”. Which basically is the act of moving new air from the lungs to the throat/mouth so you can continue equalizing after the air in your mouth has run out or is so compressed you can’t use it to Frenzel anymore. There is (or should be) a rhythm and strategy to this, that you need to get aware of.

A complementary step to all this is relaxation of the body, especially your belly and chest. Feel your dives. Know when you tense up. Pay attention to a relaxed and functional body position in all parts of your dive.

Pavol visualizes equalization pressures for you with the assistance of the EQ-tool and discusses the difference between sequential frenzel (with sequential recharges) and a continuous pressurization.

To end the video Pavol gives you one of the best exercises there are to improve your Frenzel equalization. I think I have mentioned this exercise in one of my earlier blog posts. It was a game changer for me! Practicing this empty lung exercise with the releasing of the air after every equalization gives you a feeling for rhythmically recharging the Frenzel and doing so at a minimal lung volume.

I sincerely hope these video’s help you further. Whether you’re a beginner or somebody who was on the wrong path until now or just didn’t understand any other explanations out there. Good luck with your equalization practice! 🙂

If you have any questions or considerations, please comment below!

SSI Level 2 freediving course (Tenerife)

The first posts on this blog are about my first introduction to freediving and the (bumpy) road to completing the requirements for the level 1 certification. However, after you achieve one milestone, you need to aim for another. Logical… But before doing so, you better know you can meet the requirements. That much I learned from my first course…

A good one and a half year into my freediving practice I felt ready to start the level 2 course. But where?

I decided to do it somewhere near the sea and after a lot of Googling and YouTubin’, checking ticket and accommodation prices, I chose Atlantis Freediving on Tenerife.

Tenerife is a small island in the Atlantic Ocean, part of the canary islands, and under Spanish rule. It has multiple freediving schools. The most famous are Apnea Canarias, owned by Spanish record holder Miguel Lozano, and Atlantis Freediving, a school connected to the Freedive International franchise.

The choice between the two was based on a buddy’s advice. She had spent quite some time on Tenerife and had some experience with both schools. She liked the location of Atlantis Freediving better (sheltered) and even though she had not done an official course with them (just some fun dives) they had left a good impression. Also, they have a shipwreck very close to shore. Enough reasons for me 🙂

This was going to be my first course in the ocean. Sea even. And it definitely came with some nerves. The requirements for the SSI level 2 freediving certification are:

  • Academic (online course material, theorie classes and exam);
  • Dynamic swim of at least 55 meters;
  • Static breath hold, minimum of 2:30 minutes;
  • Safety/rescue at 15 meters;
  • Hands only ascent from 15 meters;
  • Mask off ascent from 15 meters;
  • Constant weight dive to 20 meters minimum.

None of these numbers intimidated me anymore, but when you ‘must’ to do them, it is a different story. One of performance under slight pressure.

The first things that will come to light under these kind of circumstances are your weakest points. Compare it to a tennis player and his weakest stroke. In tense situations that stroke will fail on him first, and will therefore be exploited first, as you have an opponent in tennis.

Luckily there is no opponent other than yourself in freediving. But then again: aren’t you always your own biggest opponent in doing/achieving anything? Clichés are clichés for a reason. Dealing with yourself; your abilities and your beliefs is therefore paramount in taking up any challenge, if you’d ask me…

As the avid reader of this blog knows: my weak point was equalization. And even though I have gotten a better understanding of it through my practice, ánd even though I’m (by now) definitely more proficient at it than the average person: there are multiple levels to equalization for freediving. True mastery of equalization is still a somewhat enigmatic feat.

One thing is for sure though: equalization and relaxation are linked together and influence each other in a big way. So… well…: my equalization worked sufficiently to meet the requirements, but it definitely was a negative factor for my relaxation (and the other way around probably).

Fortunately, the instructor at Atlantis Freediving, Pavol Ivanov, had been dealing with the same sort of problems at the start of his freediving journey. Which made him exactly the right person to do this course with. He immediately noticed how I tried to ‘help’ my frenzel with a valsalva like push as soon as it became more challenging in depth. This is an ineffective technique, disruptive to your focus and can cause problems with the trachea (hoarse throat) and lungs (possible squeeze).

With some pointers and a couple of exercises Pavol gave me (probably the most import things I learned this course), I slowly started to get a better feeling for it and unnecessary movements and sounds started to disappear. After the three days it ‘clicked’ even more. I feel Pavol left me with some tools to take the next steps in developing a potent and consistent frenzel equalization that can take me to at least 30 meters. Kudos Pavol!

So now you might still wonder: did you meet ALL requirements and get your level 2 certification?! I will no longer keep you guys in suspense: I DID meet all my level 2 requirements (even swam 75 meters dynamic) and am now officially an advanced freediver 🙂

Of course I got a hell of a lot of other pointers as well, concerning finning and freefall techniques, as well as possible improvements to make to my recovery breaths. Things that improved during the course and things to keep improving and paying attention to on my way to an eventual level 3 course. Basically it comes down to: keep finetuning every aspect of your freediving. That figures, if you want to become a master freediver, right? Yes. Yes, it does.

Below some footage to get a sense of freediving around Tabaiba:

If you have any questions or need some information, don’t hesitate and comment below or send me a personal message!

Hasta luego amigos!

Freediving PB testing the Apneaman Buoy

Last monday I went out diving with a buddy to properly test out the Apneaman Freediving Buoy. Or maybe it’s brand name is Apneautic; hard to say, but it deserves a mention here anyway.

I got the Apneaman Freediving Buoy a couple of months ago. I ordered the complete set with the buoy, inner bladder, 40 meters of rope, weight strap, carabiners and bottom plate. Mainly because it is very competitively priced.

I believe Apneaman is Martin Zajac’s company. Martin Zajac is a freediving athlete, coach, trainer and instructor from the Czech Republic and is competing at the Vertical Blue competition this year (held this and next week). I would imagine he can properly test (and stands behind) the gear he sells.

Since there is not a lot to find about this freediving buoy on the internet I decided to make an unboxing and first real use video about it (see below). “Firs real use” in the sense that I did use it once or twice before for some shallow and exploration dives.

As you can see in the video, the first buoy that arrived had a problem with the velcro. The Apneaman staff assured me this was something that happened rarely, if ever. Their service and understanding was exceptional and they sent out a new buoy within 24 hours. Not to mention that after I sent the faulty one back, they fully reimbursed my shipping costs. So… big props to Martin and the guys at Apneaman!

Now, to the diving. I took the complete set out; buoy, bladder, rope, bottom plate, weight strap, the whole lot. It was also a good opportunity to learn something about rope handing (line handling?). And well… that sh*t ain’t all that easy, guys! But I’m getting better at it and I plan to do a video about it soon.

My buddy (a PADI master freediver) and I swam to the furthest end of the dive zone at the Vinkeveense Plassen. We let down the rope with 9kg (+/- 20lbs) of lead attached until it touched the bottom. After we got the rope tight and right, we started warmin up.

We did some free immersion dives first, then some constant weight dives. In between we tried a couple of FRC dives. I tried FRC for the first time and went to 9.6m on it. It’s a strange sensation and you get to free fall very early. Also, FRC helps practising the right equalization technique, but comes with some risks and needs to be done with care and preferably with someone who can guide you through it.

IMG_1507

I did the final constant weight dives with full lungs again and managed to reach the bottom plate! With which I also set a new personal best constant weight dive to 18.8 meters (61.6ft) of depth!

If you’ve been following this blog, you might wonder how I fared with equalizing at that depth. If you haven’t been following the blog: equalization didn’t come easy for me, as you might also be able to guess from the titles of some of my previous blog posts.

As with lots of acquired skills I believe it takes some time for the brain and body to realise what is expected of it. In that sense the old adagium “practice makes perfect” holds true for anything you want to become proficient at in life.

When you train regularly and your mind and body are getting used to float about deeper and deeper under the surface of any body of water (even if it’s green, dark and murky), you get more relaxed, you start to have more time to feel what is happening inside. This makes it possible to process new things and adapt.

Together with my buddy I figured out it I was sometimes slightly opening my glottis and transitioning back to valsalva equalization at a certain depth. So focusing on not doing that and sticking to the frenzel I got deeper and deeper more comfortably, until I reached the bottom plate.

I won’t lie to you and say that equalisation didn’t become more challenging near the end (as before it became more challenging near the previous “end”), but I didn’t feel any uncomfortable pressure or pain. And that’s how going a bit further every time and getting used to it, relaxing into it, is how we will creep a bit further away from the surface every time we practice. Slowly.